Showing posts with label Christmas. Show all posts

Monday, 4 March 2019

My Favorite Things Christmas tag collection


Hello everyone, I hope you had a good weekend and are ready to dive into another week. I had a busy time with attending a conference, hosting a family dinner for my daughter's birthday and having my 15-month-old granddaughter over for a sleepover. Now there's a misnomer - Alice hasn't quite got the hang of the whole sleepover idea and thinks it should be a playover, so sleep was in short supply lol! Anyway, welcome to the March Happy Little Stampers Christmas Challenge.


As always, we are an anything Christmas goes challenge but our optional twist this time is 'tag'. I had a fun time making a collection of tags that can either be attached to gifts or be the focal point on some Christmas cards.


I used tags from the My Favorite Things Tag-builder Blueprints 2 and 6 sets


along with stamps from the MFT Gift Tag Greetings and Santa's Elves.


I also used the Clearly Besotted Merry Little Christmas set and the


Stampin' Up Merriest Wishes set.

I actually made some repeats as well so I have lots of tags to keep me going for ages!

You'll find out how our talented DT interpreted the challenge over on the Happy Little Stampers Christmas blog, and if you decide to join us, you can link up your entries over there. I'm off for a quick nap to try and replace some lost zzzzzzzzzs

I'd like to play along at

12 Months of Christmas #51 anything goes

Alphabet Challenge  Y is for yarn, string or twine

Crafty Gals Corner Challenge #186 - tag you're it.

Thanks for stopping by.

Hugs
Carol x

Saturday, 4 November 2017

Crafter's Companion and Paper Smooches Christmas Penguin tag


Hello and welcome to the Happy Little Stampers Christmas Challenge. Anything Christmas goes for this challenge but each month we have a fun twist to make it more fun, and this time the twist is 'tag'.


Our winner for the challenge will receive a $20 coupon to spend at the shop! Check out all the details HERE.

As I sit writing this, I can hear fireworks going off for bonfire celebrations and I can't believe that we only have one more Christmas Challenge left before the big day. Where has this year gone?


I came up with this tag


1) I used a paper trimmer to cut a tag shape from kraft card and used a star stencil and some glitter paste to add stars along 2 of the edges.

2) While the paste was drying, I die cut the Crafter's Companion Cute Christmas Penguin and coloured the parts before assembling him.

3) I die cut the Paper Smooches Merry Christmas die twice and stacked it to give it a little more 
structure.

4) I cut another slightly larger tag from red card, placed the kraft tag on top of it and cut a hole through both of them before adding some ribbon to tie them together.


5) To finish off, I added the penguin and greeting to the tag and tied a little white bow around the ribbon.

I love this cute penguin and can see that I'll be pulling him out again soon. You'll find lots of inspiration over on the HLS Christmas Challenge blog, and I hope you'll join in with us this time. If you are anything like me, you'll be needing lots of tags at this time of year but remember anything Christmas goes!
Thanks for stopping by


Hugs
Carol x

Monday, 28 December 2015

Christmas gifts

Hello everyone,

I hope you all had a Happy Christmas and were able to spend some time with family and friends to celebrate the season. We had a very busy run up to Christmas with lots of choir concerts and social events which were lovely, but I'm ready to have things slow down now in this lull between Christmas and New Year. I had a few health problems throughout December so I'm afraid I have been a very poor blogger because other things had to come first, but I hope that 'normal service will resume soon' as they say!

I thought I would share a couple of Christmas gifts I made now that they have been given


This started life as a Ribba Photo Frame from Ikea. I removed the inner card frame, adhered some frosted vinyl to the inside of the glass, and then added the red design on the outside. The design came from the Silhouette store and I cut it on my Cameo out of red vinyl.

After replacing the glass in the frame, I stapled a string of battery operated Christmas lights around the inside before sticking the battery pack on the back with some velcro. This is how it looks when it is lit up


Next up is a Hot Chocolate gift set


I bought the aqua spotted travel mug and placed it in a bag with a little Christmas tree tag and some spotty aqua ribbon. Then I made a mug hug out of aqua felt from Papertrey Ink using their Coffee Cozy Dies. I added a little stitched heart to the front and made the packaging using other PTI stamps. 


I wanted to add a Costa gift card so I used the PTI Gift Card Greetings Die to make a nice little packet to hold it. I cut it from aqua mist card and stamped it with sentiments from the MFT Hug in a Mug stamp set and a snowfall background stamp.


For the front of the gift card holder, I stamped, coloured and fussy cut a cup stamp from the PTI Latte Love stamp set. A tin of yummy Green and Black Hot Chocolate finished the little gift off. I have made this kind of gift set before, but I love it in this colour.

Finally, here is a little gift holder for nail polish that I made using my Silhouette Cameo.


I cut the holder from kraft card and then made mats for it using PTI spotty kraft paper. The sentiment was embossed in white on the same paper and then cut with a couple of oval punches from Stampin' Up.


Well that's all for now except to say thank you so much for coming to visit me this past year. I hope you have found something to interest you, and I really appreciate your encouraging comments, I'll be back soon with a round up post of my favourite cards of the year, and before we know it, we'll be jumping into 2016! How did that happen so quickly?

Thanks for stopping by

Hugs
Carol x

Sunday, 29 March 2015

Christmas Tags


Hello everyone,

I hope you are enjoying the weekend and have something nice planned for your Sunday. We are back at Christmas Card Challenges today for another 'anything goes' challenge and this time I decided to make some tags.


For the first tags I used my new My Favorite Things Tag Builder 2 die set and made two of them with a positive and a negative cut


For this one I used a Papertrey Ink Tag Sale 4 die and the Framed Out #9 stamps to make the wreath. Some red pearls and glitter finished it off.


On this one I used the MFT Tag again along with a cat image from my new Mama Elephant Three Amigos stamp set, and I added a Christmas greeting.


The next 2 tags used the PTI Tag sale 3 die along with the Polka Dot Parade # 9 stamps and die in different colours, with a sentiment from Clearly Besotted which I stamped and embossed.


This next one also uses Tag Sale 3 but with a stamp from the 2009 Holiday Tag Collection and a sentiment from WPlus9 Pretty Patches: Tree


This one used PTI Tag Sale #8 and a stamp and die from WPlus9 Pretty Patches:Tree. I cut the heart from red card and used Wink of Stella to give some sparkle.


The final two were again from the MFT Tag Builder Blueprints 2 set but this time used the candy cane in positive and negative forms, along with sentiments from PTI Think Big Favorites #21.


Here they all are grouped together:-


I love that the Tag Builder Blueprints dies can be mixed and matched for different tops and bottoms, and that, although the set comes with Christmas images, you can use the basic tags for any occasion. They are smaller than the PTI Tag Sale dies which makes them better for smaller gifts but the the Tag Sale dies do have a bit more impact. I really enjoyed having a sort through all my supplies and having a fun hour putting these together, and I might do the same thing with some non holiday sets so I have some tags on hand for birthdays and other occasions.

Why not pop over to the Christmas Card Challenge blog to see what my talented Design Team mates have to inspire you with this week.


I'd like to play along with the following challenges

Merry Monday - Tree


Hiding in my Craft Room - Any Holiday

Hiding in My Craft Room


Darnell's NBUS Challenge


Thanks for stopping by


Hugs
Carol x


Wednesday, 24 December 2014

Silhouette Cameo Christmas decorations and ornaments

Hello everyone,

I just wanted to share some of the Silhouette Cameo Christmas projects I have been playing with when I've had time in the past few weeks. I have had some Ribba frames from IKEA hanging around waiting for me to think up ways of using them, and I was inspired by an idea I saw on Pinterest to try a Christmas light box;-


I used several coats of frosting spray on the glass to make it opaque so that the wires on the lights I was going to put behind it wouldn't show, but this didn't work so I put some frosted vinyl behind the glass instead. The image on the front was from the Silhouette Store and I cut it from vinyl in 2 different colours before transferring it to the front of the glass. I then took a string of battery lights and stapled them to the inner frame making sure the battery box didn't get cought up. I put the back of the frame back and stuck the battery box to the back so the batteries can be changed as necessary. This is how it looks when switched on:-


I wanted to make a bauble for my eldest son and his partner who are having their first Christmas in their new home, so I bought one of those flat, clear baubles to play with. I typed the greeting in the Silhouette Studio software and cut it out in aqua coloured vinyl before transferring it to the bauble.


On the other side, I added a snowflake before filling it with snow and adding a bow at the top.


An idea for the next ornament also came from Pinterest and this time I used a round glass bauble so it is a little more delicate. I cut a bauble shape from acetate that was just a bit smaller than the diameter of the bauble. Then I  cut a nativity scene from black vinyl and stuck it to the acetate before inserting it into the bauble and adding some snow. A bow on the top finished it off, but it was hard to get a good photo!


I wanted to make up some pedicure gift bags to put in Christmas stockings this year and I used a bag topper idea I got from the Silhouette Store:-


Love those painted toes - they really tickle my fancy!

Finally I'd like to thank you for your support and for visiting my blog and leaving such nice comments throughout the year.

 I hope you have a very happy and peaceful Christmas.

Thanks for stopping by.

Hugs
Carol x


Tuesday, 9 December 2014

Christmas table setting

Hello everyone, and a very warm welcome to Kristen of a Simply Enchanted Life, who is a new recent follower. Kristen is a stay at home Mum to 6 girls and her blog includes recipe ideas and book reviews. This busy lady also makes jewelry and handmade bath and body items to sell in her online shops.

Well today it is time for the final challenge of the year over at Holly Jolly Christmas Challenge

Holly Jolly Christmas Challenge

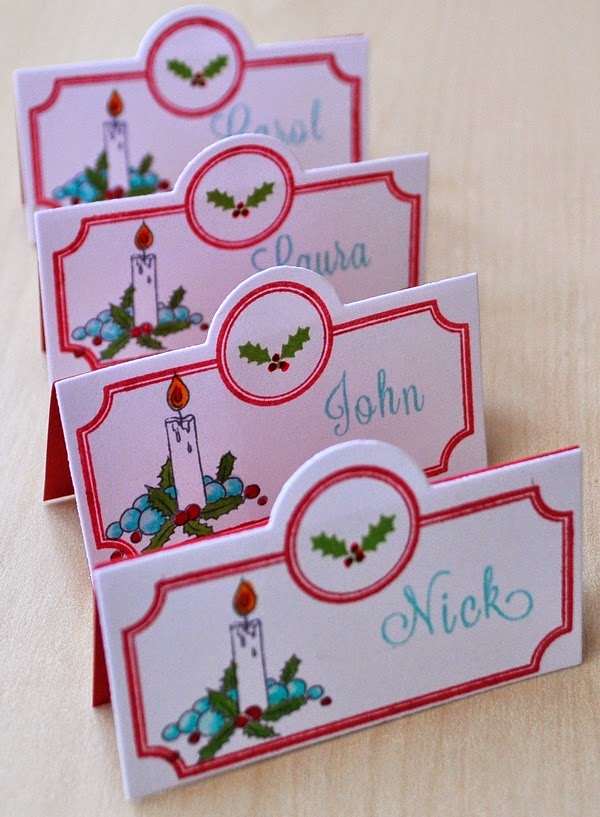
and this time it is a month long challenge with 2 themes, firstly - an anything goes Christmas card, and secondly - anything but a card. This week I am sharing my anything but a card. I chose to use a pretty Christmas candle image from Fitztown called Winter 2 and made my Christmas table place settings.


I reduced the size of the image to make my placecards and cut them out with a Papertrey Ink placecard die and stamped the matching border image on it. I finished them off by stamping the names on the cards with the AveryElle Lovely Letters alphabet stamp set, and a little holly stamp.


For the napkin holders, I simply coloured the candle images, cut them with a circle punch, and added a backing layer with a scallop punch. I made a tube of thin card to push the napkin through and adhered the focal image.


And finally, I cut out a gable favour box on my Silhouette Cameo, and added another circle focal image with a couple of background layers on the front.


I know we are all really busy at this time of year but I really enjoyed playing with these simple ideas that are easy to make multiples of, and I hope they will look good on my Christmas table.

Thanks for stopping by, and while you are here, why not pop over to the Holly Jolly Christmas Challenge and see what my talented Team mates have for your inspiration.

Hugs
Carol x


Tuesday, 20 May 2014

Wine Bottle Tags for Holly Jolly Christmas Challenge


Holly Jolly Christmas Challenge


Hello everyone,

Summer has arrived in my neck of the woods and it seems more than a little odd to be thinking of Christmas, but I'm slowly squirreling away lots of projects that will make this Christmas so much easier for me when all my cards are made ahead of time. I have this fantasy that I will be able to sit down with a glass of mulled wine in the first week of December, put some Christmas music on the player, and write my cards without feeling rushed. I'll be so laid back that I'll be able to add newsy notes to people I don't get to see too often, and really enjoy the process this time instead of frantically scribbling messages so I can get on with all the tasks still waiting to be done. Aahhh - it sounds good doesn't it? Well if you haven't made a start on your Christmas cards yet, why not join us at the Holly Jolly Christmas Challenge where you will have a weekly theme to inspire you and some prizes to be won. After all that talk about cards - the theme this week is 'anything but a card'! I thought about doing some home decor for this challenge, but decided on getting all the practical necessities completed before branching out. I have certain people who always get a bottle of wine from me at Christmas, and I always have a bottle wrapped under the tree for any unexpected visitors over the festive season, so I decided to make some wine bottle tags.


All the tags used the Papertrey Ink Wine bottle tag die and for this one I also die cut and stamped the multi layer tree from Polka Dot Parade #9. The sentiment was from Think Big Favorites #20 and I just cut some banner tails on the end. I cut the end of the bottle tag again in white card and added it to the bottom of the tag to add a little variety and finish off this bright, festive tag.


The next one is a little more muted


I used a Hero Arts fern and cone stamp and stamped it in Ocean Tides ink before colouring the cones with a Copic marker and adding some berries with gel pen and a little bit of glitter. I die cut the 'merry' several times and glued the words together to give a chipboard effect before painting over it with my Wink of Stella glitter brush. I added a block of ocean tides card to the bottom of the tag to give a slightly different look.  


The final tag has a more masculine look


I cut the wine bottle tag in smokey shadow card and stamped over it with versamark ink and an Impression Obsession star background stamp. I then cut a round PTI tag and stamped and embossed it in white using a sentiment from PTI Over Under Easy: Holiday Additions Stamp Set. I added a metal snowflake charm with a black brad and scattered a few die cut red stars to add a pop of colour. This time I left the tag tails plain.


Here are all three together


I'd like to enter these into the

Glory of Christmas Challenge - anything goes
Crimbo Cracker - festive red
Christmas Stamping - anything goes
Crafts 4 eternity - use a die cut

Thanks for stopping by and enjoy your week.

Hugs
Carol x


Saturday, 24 December 2011

Merry Christmas

Hello everyone,

I don't have time to do a full post today but I would like to wish everyone a very very happy and peaceful Christmas. I hope Santa ignores all the times you have been naughty and has you on his nice list for his travels tonight. Only one sleep left and so much to do!

Hugs
Carol x

Thursday, 23 December 2010

The Perfect Man

Hello everyone,

Only 2 more sleeps to the big day and our heating has broken down! We had friends round for dinner last night and were able to warm up one room so it was cosy, and I was so glad we have a fire in the living room. Whilst I am waiting for the gas man to come, I thought I'd share  final post before Christmas. This little gingerbread man package is something I included in my 'secret santa' gift last week. I saw the idea earlier this year and thought I would give it a try:-


click to enlarge so you can see the words


I typed the poem on the computer, cut a Kraft tag from the Cricut Tags, Bags and  Boxes cartridge and then passed it through the printer, before using PTI snowfall stamps on it.


I packed the gingerbread man in a glassine bag after it had been passed through a Cuttlebug folder.


This is the other side of the tag.


All the presents but one have now arrived and I only have to ice the cake before the big day, so I'm off to sit by the fire and have a cuppa until the gasman cometh.
 
Thank you for visiting my blog, I really appreciate all the comments you make, and I enjoy visiting other blogs, so please leave details of your own blog whilst you are here. I wish you a very happy Christmas and a fun and crafty new year.
 
Hugs
Carol x

LinkWithin

Related Posts Plugin for WordPress, Blogger...