Showing posts with label masculine card. Show all posts

Tuesday, 15 February 2022

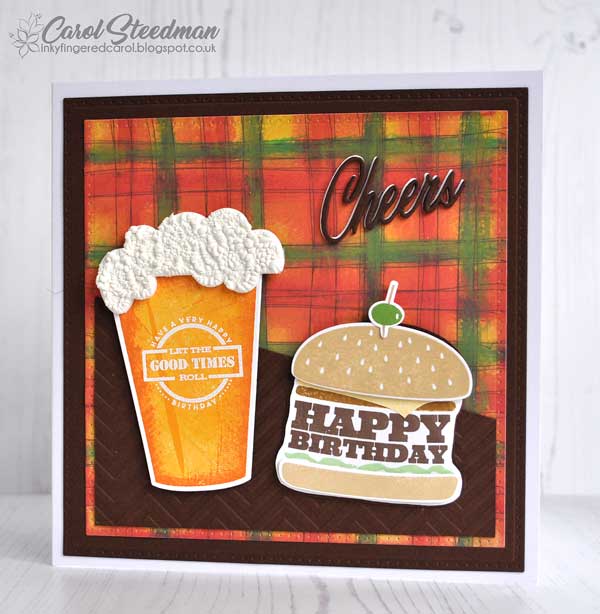
Papertrey Ink Craft Brew and King of the Grill masculine birthday card


Hello everyone and welcome to another challenge at Addicted to Stamps and More.


This time we have our birthday theme and I pulled out some old supplies to make a masculine birthday card.


I used the Papertrey Ink Kraft Brew stamp and die set for the beer glass and inked the stamp with 3 shades of ink to get a good beery colour before white embossing the sentiment on the glass. The burger was made with the King of the Grill stamp and die set. For the background, I used a plaid patterned paper from my stash and added some brown card which I embossed with a zig-zag embossing folder. Finally the die-cut sentiment was cut with brown card and then stacked and offset slightly in some white cuts. When I finished, I thought the beer looked a little bland with the beer foam just plainly cut in white card. I tried embossing it with a dotty embossing folder, but it didn't add much, so I tried using some snow marker painted across the die, and then I heated it with a heat gun to give a much more satisfying bubbly look.

You'll find lots more inspiration over on the ATSM blog and you can link your entry in the gallery over there.

I'd like to play along at


Thanks for stopping by.

Hugs
Carol x


Wednesday, 29 September 2021

Crafters Companion Diesire Shooting Stars and Papertrey Ink masculine birthday card


Hello friends and welcome to another challenge over at Addicted to Stamps and More.


This time we are looking for cards with die-cuts and/or stencils and I came up with this card.


I rarely make cards for men but I needed a card for John's birthday today so I examined my stash to see what I could come up with. I found some navy satin card and holographic silver card that I thought looked good together against a white background. The die is called Shooting Stars from Crafter's Companion and as it only cuts half a frame, I cut two and pieced them together to create the square frame and you can play find the join lol! 


The sentiment is Think Big Favorites #24 from Papertrey Ink and I stamped and embossed it with silver powder. I cut the tiny red heart to dot the i, glazed it with a glaze pen, and finished off by scattering a few silver stars that were waste pieces from the frame. I like how the holographic silver card picks up the light and colours depending on which direction you are looking at it but that is heard so show you in photo.

There's a lot of inspiration for you over on the ATSM blog and I know that my very talented teammates would love it if you drop by.

I'd like to play along at


Thanks for stopping by.

Hugs
Carol x


Friday, 21 August 2020

Hobby Art Shore Scenes card


Hello friends! I hope you've had a good week and are ready for the weekend. I really don't know why I still look forward to weekends when I'm fortunate enough to be retired but it pleases me to have some days in the week that are different, and I don't feel guilty if I abandon the jobs I started in the week.

I'm still chasing my mojo around and it is a very elusive creature these days, but I did sit down to play for the first time at the CAS Mix it up Challenge.  I love CAS designs and this challenge asks you to include other media in the design. This time the theme is to use watercolour and a beach theme.


I came up with this card using Hobby Art Shore Scenes stamp set. 


This is a scene builder stamp set that I bought after seeing Jenny Mayes use it at the Port Sunlight Craft Show and it has been sitting in my NBUS pile ever since. It turns out that scene building isn't as easy as Jenny made it look lol! 

 
Anyway, I had a go and used watered down Distress Inks as my watercolour medium, and added a bit of Hero Arts sand embossing powder on the beach. I raised a white panel over the scene using an MFT die that I thought reminded me of a porthole if you closed an eye and squinted, and I embossed the card with a PTI impression plate to add a bit of texture.

I'd like to play along at


Thanks for stopping by and I hope you have a great weekend.

Hugs
Carol x

Thursday, 2 January 2020

Papertrey Ink and Tonic Studio Sending Best Wishes masculine 40th birthday card


Hello friends and welcome to the first Simply Create Too challenge of the year.
For this challenge, we'd like to see a monochrome creation for any occasion you choose.


Simply Create Too Challenge Blog

My eldest son had a significant birthday just after Christmas so I came up with this masculine design for him. I can't believe I have a 40-year-old son - how did that happen???


I used a mix of dies for this one. The background was created using my new Tonic Studio Sending Best Wishes set. I die cut the triangles from black card and then embossed them with the embossing folder in the set. They were placed on a textured silver die-cut square, leaving a gap between them for the numbers.


The star and sentiments are from Papertrey Ink and I put them on foam tape to give some dimension.

I do hope you will visit the blog and leave my talented teammates some good cheer to start off the new year. I can't wait to see what you come up with.

I'd like to play along at

Seize the Birthday Challenge #180 - layer it

Die Cut Divas January Challenge - new things

Creative Knockouts #331 - anything goes


Thanks for stopping by.

Hugs
Carol x


Sunday, 5 July 2015

Simply Besotted 'Most Wonderful' Masculine Christmas card


Hello everyone, and welcome to another challenge over at Christmas Card Challenges where we have a very non traditional colour scheme for you


I must confess to being very challenged with this colour line up for a Christmas card, but then I realised that this is one of my favorite colour schemes for masculine cards and we have  some male only households that we send Christmas cards too, so I came up with this card:-


The sentiment came from the 'Most Wonderful' stamp set from Clearly Besotted and I stamped it with Versafine Onyx Black ink and then clear embossed it onto some dotted vellum, before die cutting it with a fishtail die from MFT Blueprints 24. I stuck this to another die cut from the same set and layered it up onto a pale grey card base. I cut the trees with a PTI die and added them to the bottom of the panel and added a couple of strips of black card to help the panel pop. I finished it off with a border of dashed lines and a tiny red star which is coated with WOS glitter and glossy accents.

Why not pop over to the Christmas Card Challenge Blog and see what my team mates have to show you, and join in with us this week. Remember that it is not necessary to follow our theme and you can enter any kind of Christmas card into the challenge. The challenge will be running for two weeks this time so you will have lots of time to play.

Thanks for stopping by.


Hugs
Carol x

I'd like to play along with


Thursday, 16 April 2015

Papertrey Ink masculine 30th birthday card using 'Noted'


Hello everyone and a particularly warm welcome to a couple of new friends who are joining us as followers this week. Nancy of the summers on 49thstreet blog is a talented artist who has two cute dogs and she makes lovely bright cards using a variety of materials, often creating really cute scenes.
Gloria has also joined us but I'm afraid I couldn't find a link to a blog Gloria, so if you have one, do please let me know so we can come to say hello.

I don't know where this week has gone to! Actually, yes I do. I made the mistake of deciding to sort through a lot of the things I kept from my children's schooldays. You know what I mean - pictures from playschool and beyond, stories, school reports and achievement certificates. I thought I would cull the rubbish and pass little packages on to the children who are now adults with their own households, but of course I had to read everything I picked up, and it took hours and hours. My husband joined me and so we reminisced about past  events and holidays etc, and, needless to say, hardly anything got thrown out!

I'd like to share a CAS, monochrome, masculine card that I made for my son's 30th birthday


I used the Noted stamps from Papertrey Ink to create the chevrons, and cut the 30 out of the pale grey card so you could see through to the bottom layer. The happy sentiment was cut with a die several times and stacked together to add some dimension. I still struggle and am out of my comfort zone with masculine cards but Nick seemed to like it, so that is what matters!

I'd like to play along with:-


Crafting for all Seasons - milestone celebrations

Fab n Funky - masculine card

The Male Room - letters and numbers

Stamplorations - stamps and numbers

Thanks for stopping by


Hugs
Carol x

Wednesday, 8 October 2014

Masculine Birthday card

Hello everyone,

Sorry to have been a bit lax about the blog lately but we are in the midst of decorating and it is taking much longer than we anticipated. We also celebrated my Husband's birthday last week and I overcame my fears and had a go at the dreaded masculine birthday card. I went for a kraft, cream and brown colour scheme, and a CAS style and came up with this;-


I used the Happy Banner from Papertrey Ink and placed brown letters in the aapertures. The stamp is from a NBUS set from Wplus 9 called Just Geometrics: Triangles and I stamped it with Versamark Ink and clear embossed it. As this wasn't going in the post, I added a pewter buckle from the mountain of embellishments that I now rarely use and finished off with a few tiny gold acrylic glitter spots. In fact the spots are so so subtle that I bet you have difficulty 'spotting ' them! Sorrreee - I couldn't help it. He had a lovely day and we went to see a show at the Opera House called Eric and Little Ern - it brought back so many happy memories of Christmas Morecambe and Wise Shows.

I'd like to enter this into the following challenges

Addicted to Stamps - anything goes.

Sweet Stamps Challenge - use kraft paper.

The Kraft Journal Challenge - no pattern paper.

Pinspirational Challenge - anything goes.

That's Crafty Challenge - keep it simple.

The Paper Girls Challenge - use solid cardstock

Thanks for stopping by and enjoy your week.

Hugs
Carol x


Sunday, 10 August 2014

Masculine birthday card

Hello everyone,

I hope you are having a good weekend. We went to a lovely wedding yesterday and the weather stayed pleasant for the whole day. We were ferried by vintage buses from the church to the reception venue and given snack packs of sparkling wine and pretzels to sustain us on the short journey. It was such fun going on one of the old buses again and passers by were obviously pleased to see them too, because we had lots of people waving to us. I was tempted to sing 'We're all going on a summer holiday' but luckily I hadn't had enough to drink so I restrained myself!

I'm slowly catching up with the Online Card Class 'Stretch your Stamps 2 and for day 2 we were asked to use background stamps again. I chose to try the perfect pearls technique and came up with this card which will be for my DH's birthday next month. I'm not very good at masculine cards but I was pleased with how this one came out and it is so apt for him because he is frequently to be found sitting around reading with a cup of tea, and I always pop a new book in with his present.


I stamped the My Favorite Things Wood Plank Background stamp onto a panel of brown card with Versamark ink and brushed on 4 different colours of Perfect Pearls before buffing it with a clean brush. I cut a hole in the panel with the Papertrey Ink larger Mat Stack 3 die and also cut some rustic cream card with the smaller mat stack die. I stamped the die cut with the leafy stamp from The Mat Stack 3 Collection, and Versamark ink before adding green and copper Perfect Pearls. I added one of  the images from All Booked Up which also had the Perfect Pearls treatment and I cut it with a circle punch and popped it on with foam tape to add a little dimension. A sentiment from the same set finished it off. I love the glow that the copper and green Perfect Pearls give - it really adds to the cosy image and will be perfect for his birthday that comes at the beginning of autumn.

What I learned

I tiny amount of Perfect Pearls goes a long way.

After applying  the Perfect Pearls it is good to buff it with a clean brush to remove the excess powder and burnish on the shine.

Perfect Pearls look great on dark card, but I was surprised by how lovely they look on the cream panel.

I really need to step out of my comfort zone and try some more masculine cards.

I'd like to enter this into the following challenges:-

Stamplorations - use stamps and die cut.

Kitty Bee Challenges - masculine birthday.

Stamping Royalty - use a background stamp.

Simon Says Stamps Monday Challenge - in the family for my husband


Thanks for stopping by.

Hugs
Carol x


Tuesday, 27 May 2014

Silhouette Cameo and Holly Jolly Christmas Flip card

Holly Jolly Christmas Challenge

Hello everyone,

I hope you enjoyed the holiday weekend and had good weather for at least some of the time. We have had a lovely time seeing friends and family and we spent a nice afternoon singing at an arts festival with our choir. I love holiday weekends but I'm always pleased to get back into my craft room for a little down time after all the busyness. I'd like to welcome Stacey from Stacey's Creative Corner who is joining us as a new follower. Stacey is a member of a number of Design Teams, including the Silhouette Challenges and you can find lots of inspiration on her blog.

Today is the start of another challenge over at the Holly Jolly Christmas Challenge, and this time we are asked to use fancy folds on our projects. I used my Silhouette Cameo to cut a flip card and then cut mats with some Nestabilities Label dies to come up with this card.


I used an image called Bauble Border from our sponsor QKR Stampede and coloured it with Copics and a metallic gel pen. I also used a sentiment from the Papertrey Ink set Rustic Wreath, which I stamped  in scarlet jewel, my favourite Christmas ink. Here is the card standing up.

When you flip the card, you have the same image with a different sentiment from the same set. I finished the card off with a couple of die cut hearts and a stars.


I used scarlet jewel card for the base because I think it lends itself to masculine cards and I have a few men I send Christmas cards to and even though this has a couple of hearts on it, I think it is an okay guy card..

I'd like to enter this into

Simply Less is More - use die cuts I may be pushing it a bit with this because of the layers, but I think the clean design and lack of fussy embellishments respects the CAS approach.
52 Christmas Card Throwdown - something old, something new, something borrowed and something blue - my card, ink, Copics and dies are my 'old, the image is my 'new and the little hearts and one of the baubles are the blue.


Thanks for stopping by and I hope you have a great week.

Hugs
Carol x

Friday, 7 February 2014

Papertrey Ink Valentine

Anniversary-blog-header

Hello everyone,

Have you been following the Papertrey Ink 7th Anniversary celebrations? There is a lot going on with challenges and free downloads, so I recommend scooting over there to have a look. Today's challenge was to use an image from this year's free download and make a card. You can enter multiple times (and so many people have!), but I only had time to make one card today, and here it is


I used Heather Nichols' image and cut it down to an irregular shape and made it into a Valentine/Anniversary card.  I added a heard border with the heart border die and a sentiment from Boy Basics Out of this World, before finishing it off with some glossy accents on the hearts. The base card was impressed with the Lil' Inkers stitched rectangle die. I used Scarlet Jewel Ink rather that bright red ans black card because I think it makes it a bit more masculine, and this one is destined for my DH next week.

I am also going to enter this into the Male Room challenge for a masculine Valentine, and at Sue's kind suggestion, I am also entering it into the Stamping Dragon 'love is in the air' challenge.

Thanks for stopping by

Hugs
Carol x


Tuesday, 23 July 2013

Papertrey Ink Unisex birthday card


Hello everyone,

It is Day 12 of the Summer Card Camp and today we were asked to use yesterdays colours and make a card with die cuts. I made a birthday card that I think would be suitable for either sex and used kraft, brown, purple and blue.


I dry embossed a piece of kraft card with an Embossabilities impression of chevrons and dots and die cut a present and bow. I also die cut a couple of square shapes and added bows to them before embellishing them with dots of coloured card that I cut with my cropodile. A simple sentiment finished it off.

Once again I am entering this into the Moxie Fab World birthday card challenge.

Thanks for stopping by

Hugs
Carol x

Monday, 22 July 2013

Papertrey Ink Masculine Birthday card.

Hello everyone,

I hope you had a wonderful weekend and are cruising nicely into a new week.


It's Day 11 of the Summer Card Camp and we had new sketches and a new colour combination of kraft, brown, turquoise, lilac and deep pink to work with today and I chose to try sketch 3.

Like Jennifer, I found this a difficult colour combination to work with but I took on board her tip to use small amounts of some colours and it turned out ok in the end. I wanted to make a masculine birthday card and came up with this one


I made a panel with the kraft and brown card and the kraft part looked a bit stark so I stamped a star background stamp with Versamark ink to add a little interest. I used the lilac ink to stamp on the aqua mist card and lilac brads to fix them to the panel and I took the aqua mist onto the top panel by adding a little strip of striped paper. I die cut the word 'hello in brown card and overstamped a dotty background stamp with Versamark to finish it off before raising it on foam tape to give a little dimension.  I fixed the panel to the base card, rounded the bottom corners and swiped a little white ink round the edges to soften them a bit. I forgot to take a photo but the inside of the card has a large Happy Birthday stamp.

Once again, I'm going to enter this into the Moxie Fab World birthday challenge.

Thanks for stopping by.

Hugs
Carol x
Sunday, 5 May 2013

Papertrey Ink Birthday cards

Hello everyone,
I hope you are having a great Bank Holiday weekend. The weather is not too bad, but it is not warm enough to sit in the garden so I don't feel guilty about spending some time crafting indoors to play catch up with the His ' Hers card class. Day 2 was all about birthday cards and I challenged myself to use the same sets of stamps from Papertrey Ink on both cards.


For the masculine card I used a white, blue and brown colour palette and circle stamps from the Sketched Shapes set. I also used a birthday circle stamp from Birthday Tags and layered this into a die cut from Limitless Layers Circles, I stamped the tag again and cut out the centre to layer up and add some dimension. I stamped and cut an arrow to point at the focal point and used some glossy accents on the central star. A few scattered stars, finished it off.

For the second card used a sketch from the current Fusion Card Challenge with a colour palette of aqua mist, spring moss, autumn rose and scarlet jewel


I again used the stamps from Sketched Shapes and Birthday Tags, and a Limitless Layers circle die, but I also used one of the Photo Finishers dies in scarlet jewel to give some bold contrast. I added a little glittered star to the birthday candles and finished off with a couple of hearts.

The class will  be over tomorrow and I am still only on Day 2 but I will continue after the close because it is such a useful exercise.

I am also going to enter this into the Passion for Papertrey Lets Celebrate challenge
and Celebrate the Occasion anything goes.

Thanks for stopping by.
Hugs
Carol x

LinkWithin

Related Posts Plugin for WordPress, Blogger...